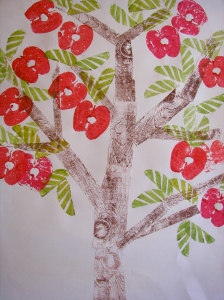
Yesterday I taught an art class to 5-7 year olds while being filmed for a kids TV show. I was asked to prepare two activities based on Natural Printmaking. It was a little tricky at first because….well, it’s March, and much of what I would normally like to use for natural printmaking, such as plants, leaves and flowers, are not available. What I came up with is a project that involves two separate printing techniques.
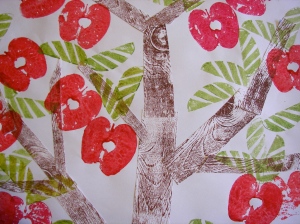
Behold my Printed Fruit Tree!
Of course, I forgot my camera so I don’t have pictures of the lovely Printed Fruit Trees that were created in the class. It’s a shame, because it was wonderful to see all the different approaches to creating the tree form. Mine is an apple tree, but for the class we had pears, apples, oranges and lemons growing on the same branches! I have to say that though I love the look of printed fruits, I found it a little hard to contemplate the waste. I’m sure this is mainly because we still try to get most of our produce locally, and though during the winter we buy oranges and even bananas, it still feels quite “luxurious”! But I’ll set that aside for a moment. Anyway, it is possible to do this project with just one apple!
I admit, I’m pretty happy with this, so I wrote out a little tutorial in case anybody is interested. Here it is:
Printed Fruit Trees
Materials:
Paper
Piece of wood with a pronounced grain pattern. Test it by doing a pencil rubbing.
Brayer (roller)
Block printing ink or paint in brown or black
smooth surface for rolling ink – glass, Plexiglass, plastic
scissors
glue stick
Shallow container and thin sponge for print pad in as many colours as paint, or paint brush
Fruit (apple, pear, orange, lemon) cut in half
Wood Grain Printing
Step 1: Use the brayer to spread a little ink on a piece of Plexiglass. Listen for a “tacky sound” to know it is at the right thickness. Roll ink all over the piece of wood.
Step 2: Place a piece of paper ON TOP of the inked piece of wood. (Many children are familiar with stamping and I found even after demonstrating I needed to remind them to do it this way, instead of trying to stamp the wood on paper, which does not give a good print.) Rub hands all over paper in a circular motion. Lift paper off and check out the wood grain! Repeat this several times with the same, or a different piece of wood until you have enough “wood” for a tree. Let it dry.
The Tree
Cut out a trunk and branches from the wood grain prints and glue them to a large paper in the form of a tree. With younger children you could easily assist by cutting strips of different widths and lengths while they arrange and glue them on. (but do make sure they are in charge of that process – that’s how you get such beautiful and unique work)
Fruit Printing
Step 1: Place the tree paper on an old, folded towel. This soft surface makes it easier to get a good print. I skipped this step with the kids, and it was ok, but while doing my own I found it really was better. If working with a small group or single child it’s worth doing.
Step 2: Put the sponge in the shallow container and add a few tbsp of paint. Press half a piece of fruit, cut side down, on “print pad” . Alternatively, with a small group, paint can be applied to the fruit with a brush.
Step 3: Press fruit firmly on paper. Another option, particularly with little ones (and I’d probably do this in a REAL class) is to let the kids experiment with fruit print on a big piece of paper where they can just stamp away and figure out how it all works. Then bring out the tree. Having done some experimenting they may have a more “compositional” approach to adding fruit.Use many different fruits to create a “Crazy Fruit Tree”!
I felt my tree needed a little something more so I cut a simple leaf shape out of a quarter apple and printed some leaves. In the summer or fall I think it would be great to experiment with printing using real leaves. This would be yet another printing technique and perhaps more in keeping with the rest of the project. Printing with real wood, printing with real fruit and then printing with real leaves. Oh, or even doing some leaf rubbings and furthering the collage element by gluing them on!


Absolutely love these trees.
Soooo pretty! Love it 🙂
Pingback: Dipingere un albero « moms in the city
great idea! I’ll do it for sure this summer with my 2 and 4-years old daughters . I’ve linked your post in my blog, as I want to share this idea with my readres. Hope it’s fine for you
Ciao
Thanks! I hope you have fun with it!
I love this! I’m adding it to my file for Fall/Start of School activities.
Thank you!!
Pingback: L’atelier du mercredi : l’impression à la pomme | MES PETITES MAINS // magazine
Catherine, I love this idea. I featured it on my blog today. Thanks for sharing!
This is a terrific craft, I teach elementary and my students will love it.